Are you looking for a straightforward guide on how to start a blog?
Welcome to “How to Start a Blog: Your Step-by-Step Guide,” where we provide a detailed, easy-to-follow approach to launching your blog. Whether you’re a complete beginner or need a clear roadmap, this guide is designed to help you get your blog up and running with minimal hassle.
In this comprehensive guide, you’ll discover exactly how to start a blog, from choosing the ideal blog topic and selecting the best blogging platform to setting up reliable web hosting. We’ll walk you through customizing your blog to reflect your unique style and attract visitors. Plus, learn how to use WordPress effectively to enhance your blog’s functionality and launch it successfully.
This article is crafted specifically for those eager to start blogging quickly and efficiently. No need to be overwhelmed by technical jargon—our step-by-step instructions make the blogging process simple and enjoyable. Follow our guide on how to start a blog and transform your idea into a thriving online presence.
Step 1: Pick a “Perfect” Blog Topic
Choosing the perfect blog topic is the critical first step in starting a blog. This decision shapes your blog’s identity and sets the direction for all future content. Whether you’re a business aiming to promote your products or an individual eager to share your passion, selecting the right topic is crucial for your blog’s success.
Why Your Blog Topic Matters
Your blog topic is the cornerstone of your content strategy. It plays a significant role in attracting and retaining your audience. Here’s why your topic choice is so important:
- Passion and Expertise: Selecting a topic you are passionate about ensures that you’ll stay motivated to produce content regularly. If you have expertise in this area, you’ll be able to provide valuable insights, making your blog a go-to resource for readers.
- Audience Connection: Your blog topic needs to resonate with your target audience. When your content aligns with what your readers are looking for, it builds trust and encourages them to return to your blog, engage with your posts, and share them with others.
- Content Consistency: A well-chosen topic helps maintain consistency in your content. This consistency is essential for SEO, as it signals to search engines what your blog is about, improving your chances of ranking higher in search results.
Key Questions to Ask Yourself
Before finalizing your blog topic, reflect on these key questions:
- What am I truly passionate about? Your passion will fuel your creativity and persistence, even when the going gets tough.
- Does my target audience share this passion? It’s important to ensure that there’s a demand for the content you want to create. The more your readers connect with your content, the more successful your blog will be.
By aligning your passion with your audience’s interests, you’ll create a blog that is both authentic and engaging, helping you stand out in a crowded online space.
Examples of Popular Blog Topics
If you’re struggling to pinpoint the perfect topic, consider exploring one of these popular niches:
- Food: Share your culinary adventures, recipes, or cooking tips. Whether you focus on quick weeknight meals or elaborate gourmet dishes, there’s always an audience hungry for food content.
- Travel: Document your journeys and offer travel advice. From budget travel hacks to luxury getaway recommendations, travel blogs are always in demand.
- Tech: Explore the latest in technology, gadgets, or software. With technology constantly evolving, there’s no shortage of topics to cover.
- Fashion: Showcase your style and offer fashion tips. Whether you’re into high fashion or thrift store finds, fashion blogs have a dedicated following.
- Health and Fitness: Provide advice on maintaining a healthy lifestyle. From workout routines to nutrition advice, health and fitness blogs can inspire readers to lead healthier lives.
- Finance: Educate your readers on managing their finances. Personal finance, investing, and budgeting tips are highly sought after.
These are just a few examples, but the key is to choose a topic that excites you and has a clear audience. Your passion combined with audience demand will help your blog thrive.
Knowing Your Audience
Understanding your audience’s needs and preferences is crucial to your blog’s success. For example, if you’re passionate about cooking, consider what your readers are interested in. Do they want quick, easy meals for busy weeknights, or are they more interested in gourmet dishes for special occasions? Tailoring your content to meet their needs will help you build a loyal readership.
It’s also important to keep an eye on trends within your chosen niche. Engaging with your audience through comments, social media, or surveys can provide valuable insights into what they want to see more of.
Remember: Don’t overthink it. Start with something you love, and you can refine your focus as you go. Your blog can evolve with time, but starting with a topic you’re passionate about will give you the momentum you need to get off the ground.
Naming Your Blog and Choosing a Domain
Once you’ve settled on a topic, the next step is choosing a name that reflects your blog’s focus. A good blog name should be:
- Descriptive: It should give potential readers a clear idea of what your blog is about.
- Memorable: A catchy, easy-to-remember name will help you stand out and make it easier for readers to find you.
- Available: Ensure that the domain name is available. If your first choice is taken, consider alternatives like different extensions (e.g., .net, .org) or adding small words or dashes between words.
When selecting a domain, it’s vital to choose one that aligns closely with your blog’s purpose. For instance, when creating MyBlogPlan, I wanted a domain that clearly communicated the essence of the site—providing a structured plan for bloggers. This not only makes it easier for potential readers to understand what the site offers but also helps in building a brand that resonates with the target audience.
Pro Tip: Don’t stress too much about the name. You can always change it later if needed. The most important thing is to start creating content and establishing your presence online.
Step 2: Choose a Blogging Platform
Selecting the right blogging platform is one of the most crucial decisions you’ll make when starting a blog. Think of it as laying the foundation for a house; just as a strong foundation supports everything built on top, the right platform ensures your blog runs smoothly, looks professional, and meets your needs as it grows.
Why Choosing the Right Platform Matters
Your blogging platform influences almost every aspect of your blog—from its design and functionality to how easily you can publish and manage content. Some platforms are designed for beginners with user-friendly interfaces but may have limitations on customization and scalability. Others offer more advanced features but come with a steeper learning curve.
The platform you choose should align with your long-term goals. If you’re starting a personal blog with occasional posts, a simple, free platform might suffice. However, if you plan to grow your blog into a full-fledged website with multiple features, you’ll need a platform that offers flexibility, scalability, and a robust set of tools.
Popular Blogging Platforms: A Quick Overview
Here’s a quick look at some popular blogging platforms:
- WordPress.org: The most popular platform for bloggers, WordPress.org is free to use and offers complete control over your blog. It provides thousands of themes and plugins to customize your site, making it a top choice for both beginners and experienced bloggers. However, it requires you to purchase hosting and a domain name separately.
- WordPress.com: A more beginner-friendly version of WordPress, this platform handles hosting for you, but it comes with more limited customization options unless you opt for a paid plan.
- Blogger: A free platform by Google that’s easy to set up and use, Blogger is great for those just getting started. However, it offers fewer features and customization options compared to WordPress.
- Wix: Known for its drag-and-drop interface, Wix makes it easy to design your blog without any coding knowledge. While it’s user-friendly, it can become expensive if you want to unlock more advanced features.
- Squarespace: A good option for creatives, Squarespace offers beautiful, professionally designed templates and an intuitive interface. However, it comes at a higher cost, and customization can be limited.
Why WordPress is the Best Choice
When it comes to flexibility, customization, and overall control, WordPress.org stands out as the top choice for most bloggers. Here’s why:
- Complete Control: WordPress.org allows you to fully customize your blog’s design, functionality, and content. With thousands of themes and plugins available, you can create a unique site that perfectly reflects your brand or personal style.
- Scalability: As your blog grows, WordPress.org can grow with it. Whether you want to add an online store, a membership area, or a forum, WordPress makes it possible.
- SEO-Friendly: WordPress is designed with SEO in mind. With the right plugins and practices, you can optimize your blog to rank higher in search engine results, attracting more traffic over time.
- Support and Community: The WordPress community is vast, with countless forums, tutorials, and plugins available to help you with any issues you might encounter.
Case in Point: My website, MyBlogPlan, is built on WordPress.org, allowing me to customize everything from the design to the functionality to meet my specific needs. This platform’s flexibility has enabled me to create a professional and user-friendly site that supports my blogging goals.
Getting Started with WordPress
If you decide to go with WordPress.org, your next steps will involve purchasing a domain name and hosting, which I’ll cover in the next section. But rest assured, with WordPress as your platform, you’ll have all the tools you need to create a successful blog.
By understanding the strengths and limitations of different blogging platforms, you can make an informed decision that sets your blog up for success. WordPress.org, in particular, provides the flexibility, control, and scalability needed to support your blogging journey from the first post to a thriving online presence.
Step 3: Get the Best Web Hosting
Web hosting is the backbone of your blog’s online presence. If you think of your blog as a house, web hosting is the land it’s built on—without it, your blog wouldn’t exist online.
What Is Web Hosting?
Web hosting is essentially a service that stores all your blog’s files—like posts, images, and data—on a server that’s connected to the internet. When someone types your blog’s URL into their browser, the web host delivers your blog’s content to them. This makes web hosting a crucial component of your blog’s functionality and accessibility.
Why Choosing the Right Web Hosting Matters
Selecting the right web hosting provider is vital for several reasons:
- Performance: A good web host ensures fast loading times, which is essential for user experience and SEO. If your blog takes too long to load, visitors may leave before they even see your content.
- Uptime: Reliable web hosts guarantee your blog will be online and accessible almost 100% of the time, ensuring that your readers can access your content whenever they want.
- Support: Quality hosting providers offer customer support to help you resolve any issues quickly, so you can focus on creating content rather than troubleshooting technical problems.
Bluehost: A Top Choice for Your Blog
When it comes to choosing a web host, Bluehost is a popular choice among bloggers, and for good reason. Not only does Bluehost offer excellent performance and reliability, but it also has one-click WordPress installation, making it incredibly easy to get your blog up and running. This is particularly beneficial for beginners who may not be as familiar with the technical aspects of starting a blog.
If you’re ready to choose a web hosting provider, consider visiting MyBlogPlan for more detailed guidance on setting up your blog with Bluehost. Here, you’ll find step-by-step instructions, tips, and recommendations to help you make an informed decision.
Remember, the right web hosting can make a significant difference in the success of your blog, so choose wisely!
Step 4: Set Up Your Blog
Setting up your blog can seem daunting, but with Bluehost, the process is straightforward and beginner-friendly. Bluehost offers excellent web hosting packages tailored for starting your WordPress blog with minimal hassle.
One of the best things about Bluehost is its simplicity. You don’t need to worry about complex instructions—setting up your blog can be done in just 20-30 minutes.
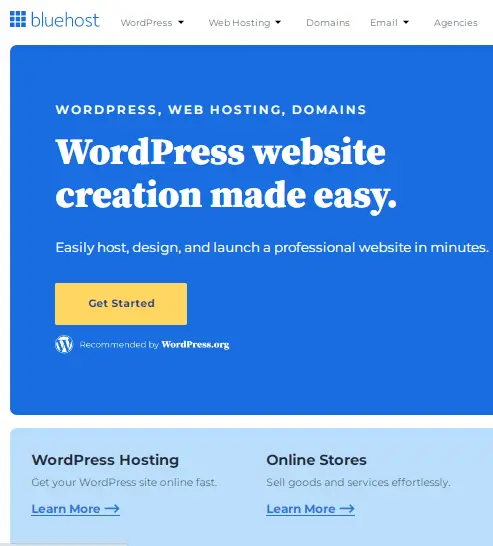
[→ Click here to head over to Bluehost and hit the “Get Started” button]
Why Choose Bluehost?
Bluehost is the most recommended hosting provider by WordPress, and with good reason. It powers millions of websites worldwide, providing a reliable and robust platform for your blog.
When you sign up with Bluehost, you’re guided through an intuitive setup process, which includes:
- Free Domain Name for the first year: Secure your unique online address without any additional cost.
- Free SSL Certificate: Ensure your website is secure and trusted by your visitors.
- One-click WordPress Installation: Get your WordPress blog up and running in no time.
- SSD Web Storage: Enjoy faster performance for a seamless user experience.
- 24/7 Live Expert Support: Access help whenever you need it.
- 30-day Money-back Guarantee: Try Bluehost risk-free.
Step-by-Step Setup
- Choose a Hosting Package: Start by selecting a hosting package that suits your needs. The basic package is perfect for beginners as it includes all the essentials.
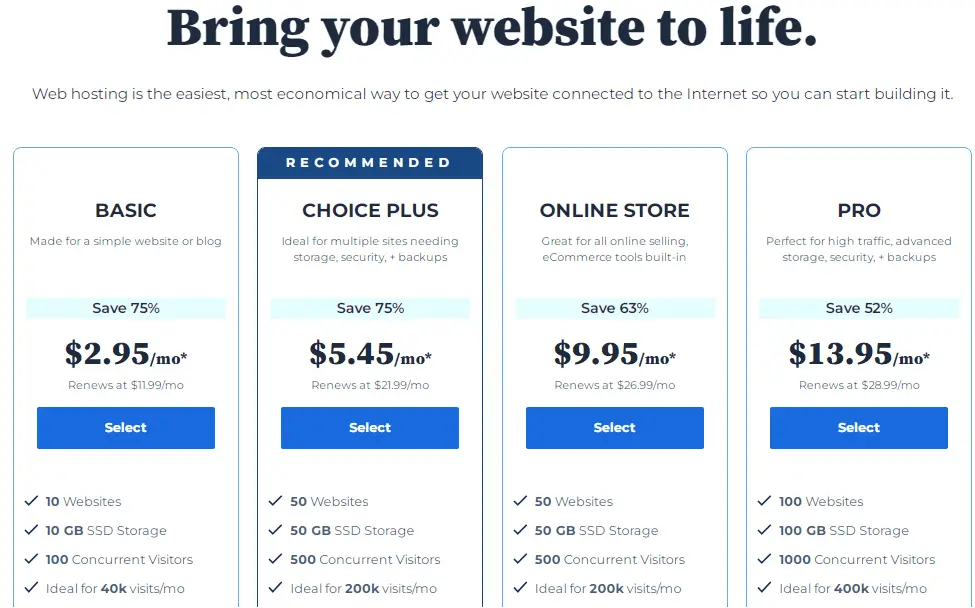
- You can always upgrade later if you need more features or want to start multiple blogs.
- Select Your Domain Name: Enter the domain name you wish to use. This could be your name, your company’s name, or a creative name that reflects your blog’s theme.
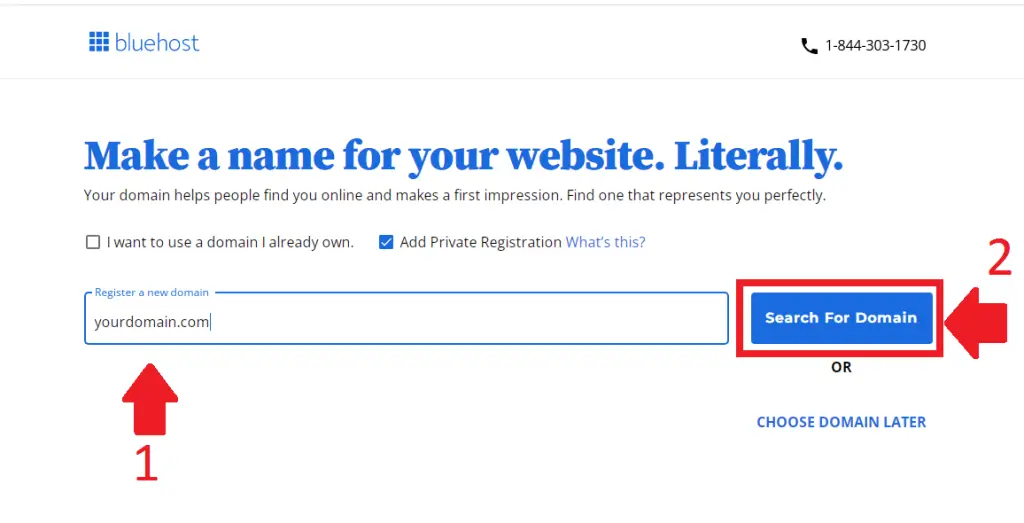
- Bluehost offers a free domain name for the first year and includes a free SSL certificate, saving you around $30 right from the start. Pro Tip: Choose a domain name that’s short, memorable, and easy to spell. If your first choice isn’t available, you can either try another name or select “I’ll create my domain later” to proceed with setting up your blog.
- Create Your Bluehost Account: You can sign up using your Google account or manually enter your contact information. Double-check your details to ensure everything is accurate.

- Select Your Package Details: Choose a pricing plan based on your preference. You can pay for 12 or 36 months upfront. If you opt for the 12-month plan, your yearly expenses will be only $35.40, and there’s a 30-day money-back guarantee to eliminate any risks.
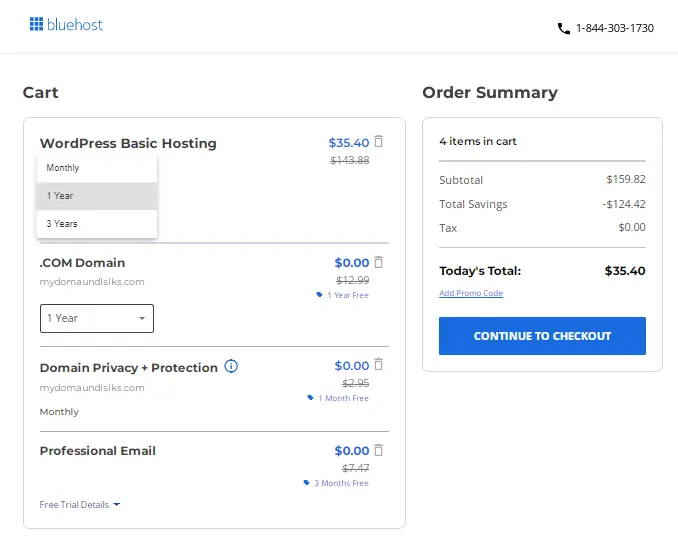
- Note: Watch out for pre-selected extras. While “Domain Privacy Protection” is highly recommended to keep your personal information private, other options might not be necessary for beginners. What is Domain Privacy Protection? It shields your personal information (such as your name, address, and phone number) from being publicly accessible through the WHOIS database.
- Complete Your Purchase: Enter your payment details, review Bluehost’s policies and terms, and click the green “Submit” button to finalize your purchase

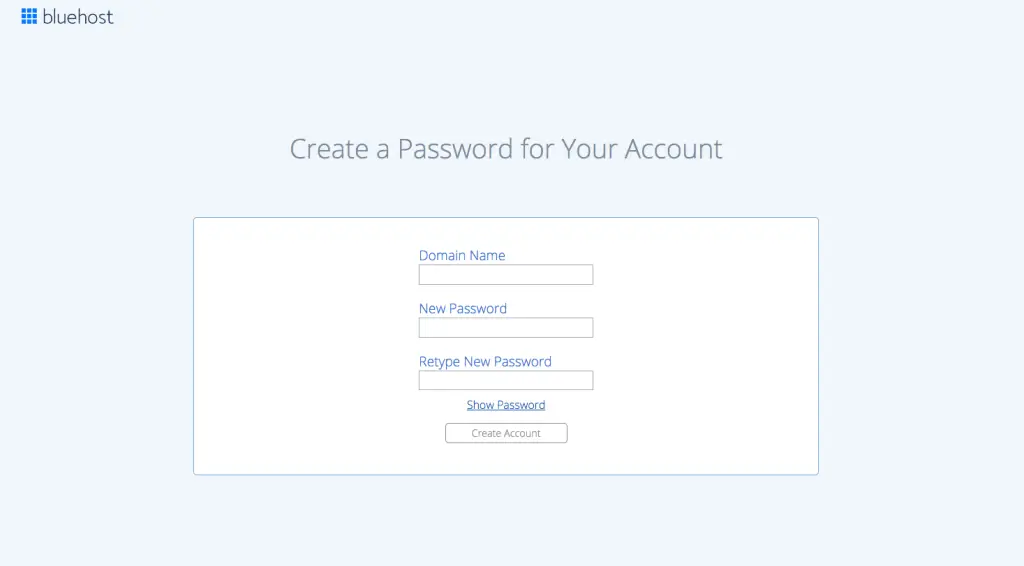
- Create Your Bluehost Account Password: This password is for accessing your Bluehost account. Your WordPress login details will be sent to you via email.
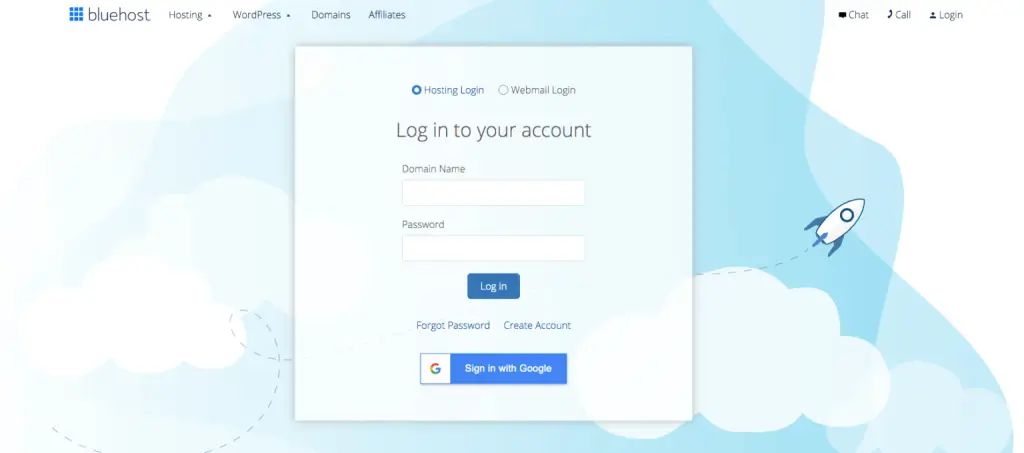
- Log in to Your Bluehost Account: Use the password you just created or sign in with Google if you registered that way.
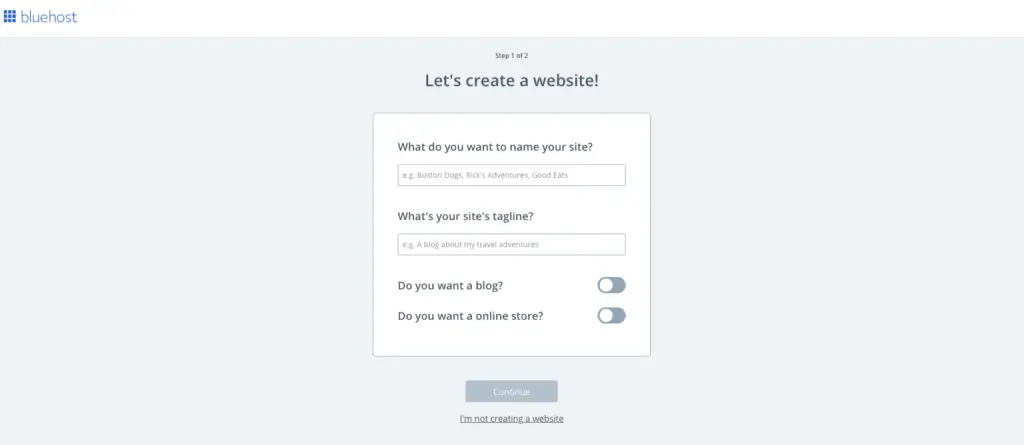
- Name Your Blog: Provide a name and tagline for your blog. Make sure to toggle the switch next to “Do you want a blog?” to confirm your setup.
- Choose a Theme: Bluehost will prompt you to select a theme for your blog. You can opt for a free or premium theme, but don’t worry—you can always change it later.
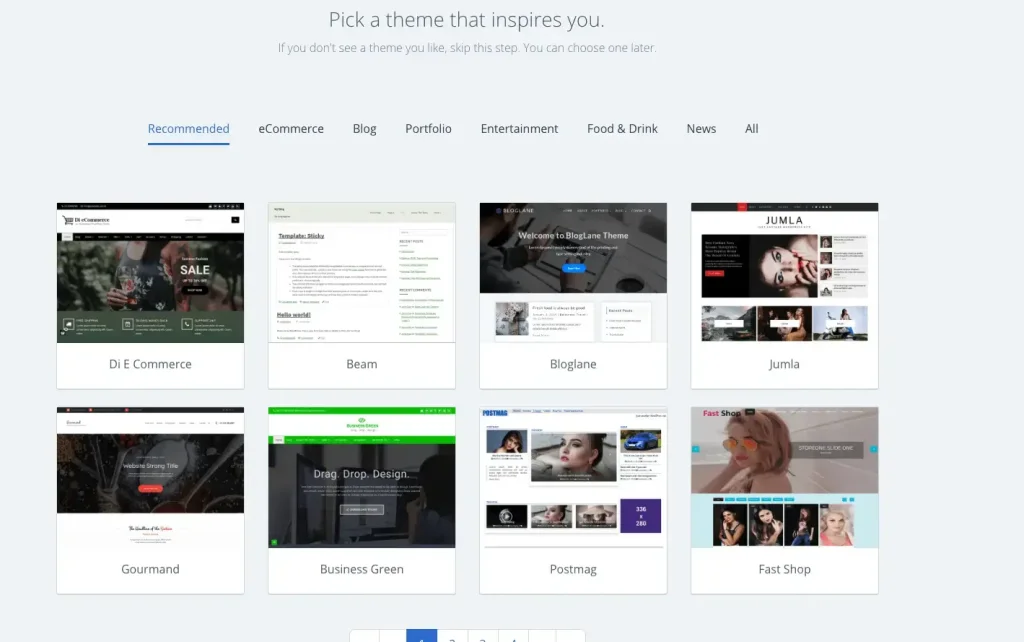
Once you’ve completed these steps, Bluehost will automatically install WordPress, and your blog will be ready to go.
If you run into any issues, Bluehost’s support team is available 24/7 to assist you. They also offer a comprehensive knowledge base filled with articles, guides, and answers to common questions, making it easier to find the help you need.
Step 5: Get Started With WordPress
Now that you’ve set up your blog, it’s time to dive into building and customizing it using WordPress. This step is where your blog truly starts to take shape, and you have the freedom to design it according to your vision.
Understanding Your Login Information
To manage your blog effectively, you’ll need two sets of login credentials:
- Bluehost Login Details: These credentials are used to access your hosting account, manage your hosting settings, and handle billing.
- WordPress Login Details: These are your keys to the WordPress admin area, where you’ll create content, customize your blog, and manage plugins.
You’ll find yourself using the WordPress login details frequently, as this is your gateway to the WordPress Dashboard—your blog’s command center.
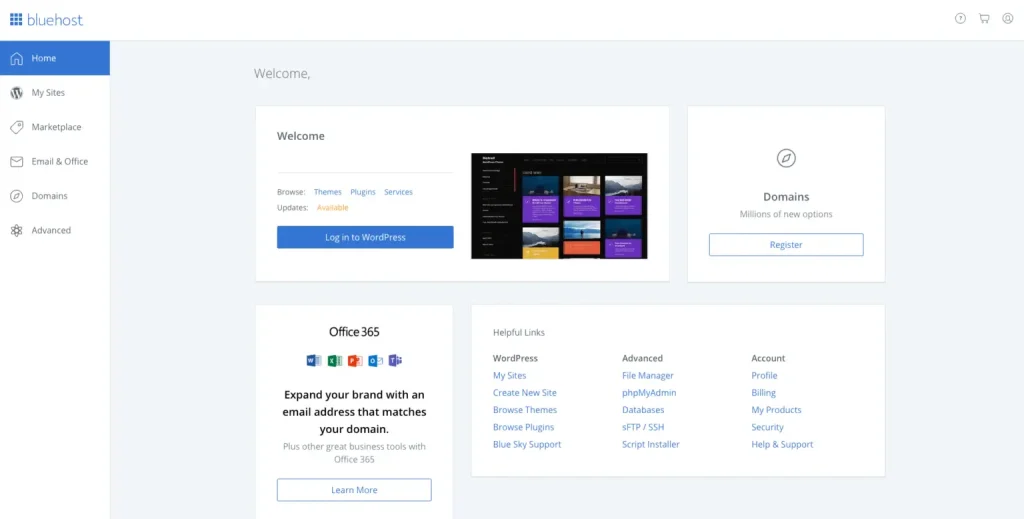
Welcome to the WordPress Dashboard
The WordPress Dashboard is where all the magic happens. Here, you can write and publish blog posts, add images, and manage various aspects of your blog. It might seem overwhelming at first, but don’t worry—it’s much simpler than it looks.
To help you get started, I recommend checking out my WordPress Beginner’s Guide for a comprehensive overview of how to navigate and use WordPress.
Essential WordPress Settings
Before you start creating content, there are a few settings you should review to ensure your blog is set up correctly.
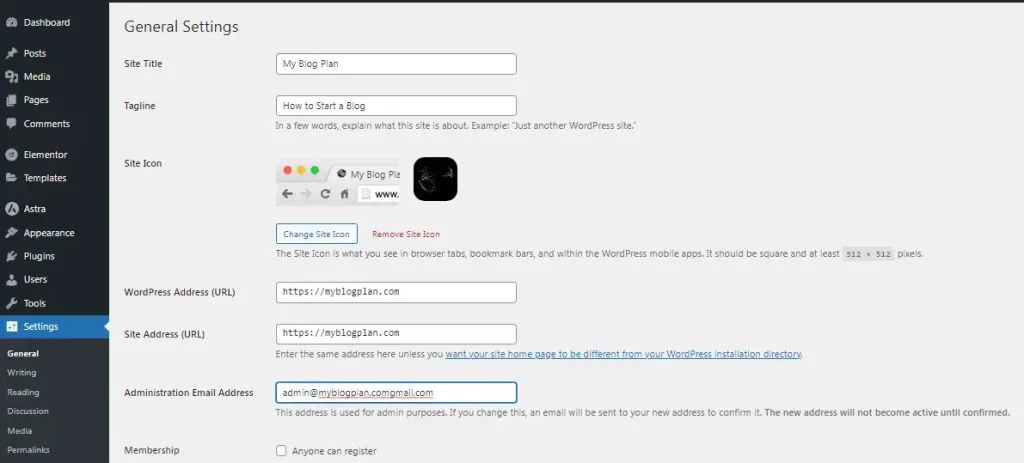
- Site Title and Tagline: Navigate to Settings > General. Make sure your site title and tagline accurately reflect your blog’s focus. Your tagline should be a concise phrase that captures the essence of your blog. You can update these anytime.
- Site Address (URL): Ensure your site address starts with
HTTPS://rather thanHTTP://for secure browsing. If you need assistance, Bluehost support can help verify your SSL certificate. - Admin Email: If you need to change the administrator email, you can do so here. Make sure the new email is active and confirm any changes.
- Membership: If you don’t plan on allowing new members to register on your blog, leave this option unchecked.
- Timezone and Date: Set the correct time zone for your blog. This setting is particularly important if you plan to schedule blog posts for future publication.
Next, go to Settings > Permalinks and select “Post name.” This permalink structure is SEO-friendly and makes it easy for your readers to understand your blog’s URLs. Don’t forget to click “Save” after making any changes.
Installing Essential WordPress Plugins
Plugins are a powerful feature of WordPress, allowing you to add new functionalities to your blog with just a few clicks. Here are a few must-have plugins to get you started:
- Yoast SEO: This plugin helps you optimize your blog posts for search engines, making it easier for readers to find your content via Google and Bing. To install Yoast SEO:
- Go to Plugins > Add New.
- Search for “Yoast SEO” in the search bar.
- Click “Install Now” and then “Activate.”
- WordFence: For enhanced security, install the WordFence plugin to protect your blog from potential threats.
- Contact Form 7: This plugin allows you to add a contact form to your blog, enabling visitors to reach out to you easily.
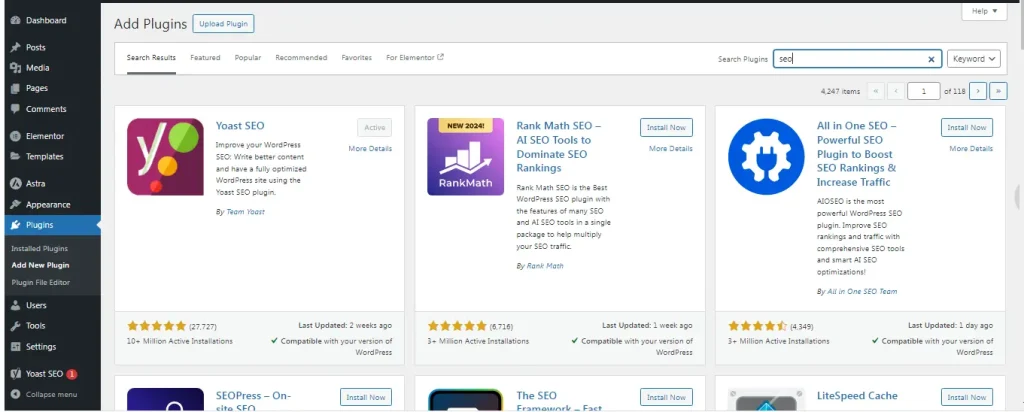
Most plugins come with setup guides, so you won’t need to worry about complex configurations. Simply follow the prompts, and you’ll have your blog fully functional in no time.
With these steps completed, your blog is ready to go live. You’re now equipped with the tools and knowledge to start sharing your content with the world!
Step 6: Customize and Launch Your Blog
Now that your blog is set up, it’s time to make it truly yours by customizing its design. You can change the look and feel of your blog by selecting a theme that reflects your style and aligns with your content.
Customizing Your Blog’s Design
To start customizing your blog:
- Change Your Theme:
- Go to Appearance > Themes > Add New.
- Search for a theme that fits your vision, or upload a premium theme if you’ve already purchased one. What Are WordPress Themes?
A WordPress theme determines your blog’s appearance, including layout, colors, fonts, icons, widget areas, header images, and background images. It controls the overall visual design of your blog or website. ![Customizing Themes]
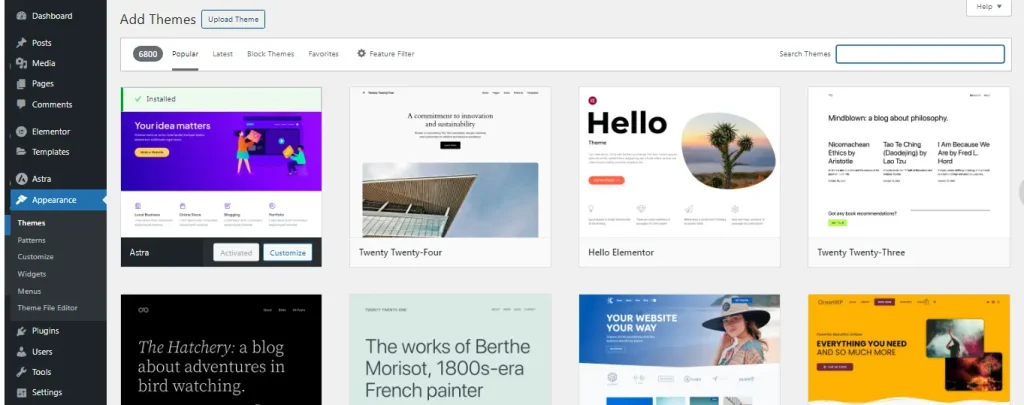
- One popular theme I recommend is Astra. It’s versatile and looks great on all devices—PCs, laptops, mobiles, and tablets. The free version is more than sufficient for most blogs, but if you desire more customization options, you can upgrade to Astra PRO.
- Apply and Customize Your Theme:
- After selecting your theme, go to Appearance > Themes > Customize.
- Use the customizer to make real-time adjustments to your blog’s layout and design. You can personalize your site’s header by adding a logo or menu items, modify the blog layout, add widgets to the sidebar, and customize the footer area—all without needing to write any code. ![Customizing Layout]
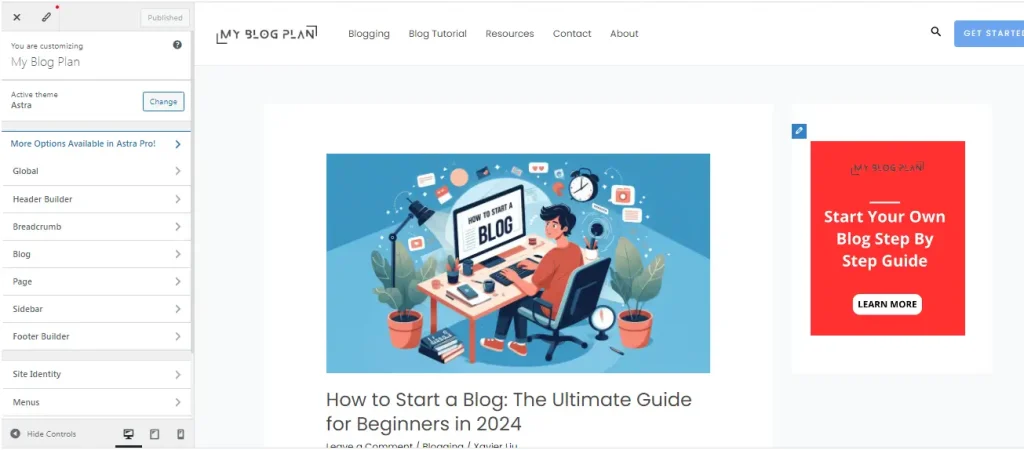
- It might feel overwhelming at first, but take your time to explore the options. You’ll find it easier as you go.
Writing Your First Blog Post
With your theme set up, it’s time to start creating content. If you’re unsure where to begin, don’t worry—just write about something related to your blog topic. It doesn’t have to be perfect; you can always edit your posts later.
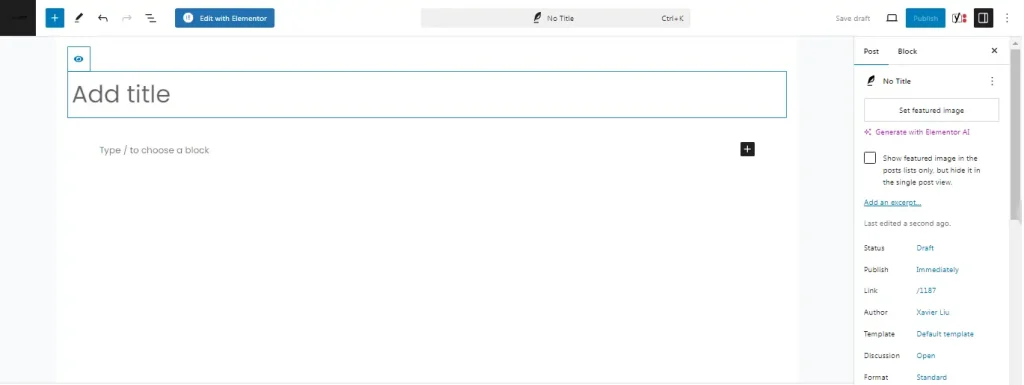
- To create a new post, go to the Posts section and click Add New. ![Creating a Post]
Essential Pages for Your Blog
Beyond blog posts, certain pages are essential for transparency and providing important information to your readers:
- About Page: Introduces who you are and what your blog is about.
- Contact Page: Provides a way for readers to reach you.
- Disclaimer Page: Outlines any disclaimers regarding content.
- Privacy Policy Page: Explains how you handle personal data.
- Terms of Service Page: Details the terms under which your blog operates.
To create a new page, go to Pages > Add New.
![Creating Pages]
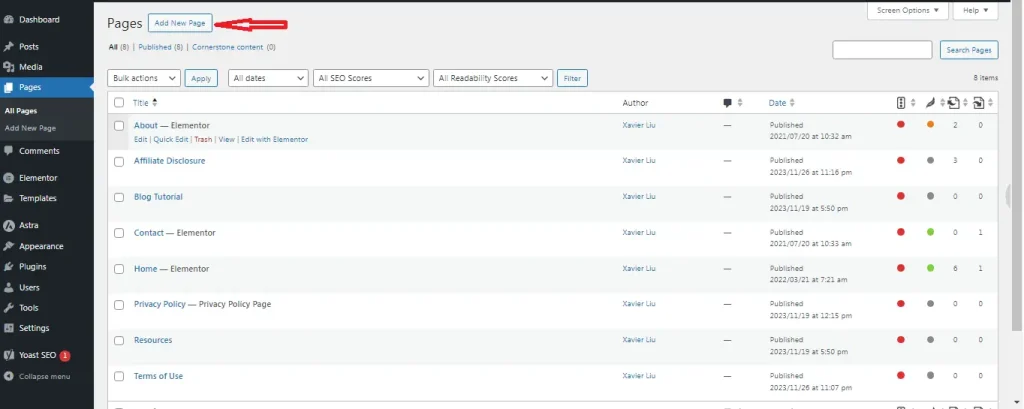
If creating these pages feels daunting, you can use services like CookieYes to generate Privacy Policy pages that you can copy and paste onto your blog.
Launching Your Blog
Now that everything is in place, it’s time to launch your blog. But first, you need to remove the Bluehost “coming soon” page:
- Log into your WordPress Dashboard (
yourblog.com/wp-admin). - Go to Settings > General.
- Scroll down to find the Bluehost Coming Soon Page option and turn it off.
- Click Save.
Once done, open a new browser window, type in your domain name, and admire your brand-new blog in all its glory.
Congratulations! Your blog is now live and ready to be shared with the world. You’ve successfully created a self-hosted WordPress blog, one of the most popular types of blogs out there. I’m thrilled for you—well done!
What’s Next in Your Blogging Journey?
Now that your blog is up and running, it’s time to focus on creating valuable content and growing your audience. Here’s how you can take the next steps to ensure your blog thrives:
Focus on Quality Content
As a beginner blogger, start by writing in a way that feels natural to you. Don’t worry about perfection—blogging is a learning process. Experiment with different writing styles and see what resonates with your audience. Look at other blogs in your niche to better understand what your target audience is interested in.
Drive Traffic with Pinterest
Pinterest is an excellent platform for driving free traffic to your blog. If you’re new to Pinterest, check out my article “Pinterest for Bloggers” to get started. Sharing your content on Pinterest can significantly boost your blog’s visibility.
Prioritize Content Over Monetization
While it’s tempting to focus on making money right away, the key to long-term success is building a blog with valuable content. Once you’ve established a strong audience, monetization will follow naturally. Consistently creating content that genuinely helps your readers is the foundation of a successful blog.
Essential Tools for Bloggers
To enhance your blog and attract more readers, here are a few tools that can make a big difference:
- Tailor Brands: An all-in-one logo design and branding platform. Tailor Brands uses AI to help you create stunning logos, even if you have no design experience.
- ConvertKit: A robust email marketing tool tailored for creators like bloggers, YouTubers, and podcasters. It’s designed to help you earn a living from your creative efforts.
- Tailwind: A powerful Pinterest tool known for its advanced scheduling options, analytics, and the ability to create eye-catching pins. It’s a must-have for any new blogger aiming to grow their Pinterest presence.
Track Your Blog’s Performance
To measure and improve your blog’s performance, make sure to set up the following:
- Google Analytics: This free tool from Google is essential for tracking your website’s performance and understanding your audience. Setting up Google Analytics on your WordPress blog is straightforward, and there are plenty of guides to help you get started.
- Google Search Console: This tool lets you see how Google views your blog and its search engine rankings. Setting up Google Search Console is crucial for monitoring your site’s visibility in search results.
If you need any hosting-related support, Bluehost offers live chat and phone assistance. Additionally, the WordPress support forum is a great resource for learning more about WordPress and getting help with specific themes or plugins.
For more tips and strategies, explore the other blogging-related articles on this site to further sharpen your blogging skills.
Ready to Start?
Now it’s your turn! Why not take the plunge and start your blog today?
Happy blogging!

